Nature Photo Frame

Here is a fun little project to do w/ the kids this Fall. Help your kids make their own special nature photo frame. We have not done this one yet; but, will be doing it soon ... then I will post PICS of ours.

Supplies:
Photo that your child loves
Construction Paper
Sticks
Tab off of a Soda Can
Glue

First you will need to go exploring in your yard w/ your kids. Fall is the perfect time to find little sticks lying all over the ground. Have your kids collect several sticks for their project. If your kids would like, you can also pick up some pretty leaves or other things they may find while exploring to add more decoration and originality. If you do use leaves, spray them ahead of time w/ clear non-yellowing paint to give them a glossy look and help them last longer. You can do the same w/ the sticks if you wish. The clear spray will also give the sticks a glossy look. Personally, I prefer to do this because I like the way it makes the project look.

Take the photo that you and your child has picked out. Since it is close to Halloween, your kids may prefer to use a photo of themselves in their Halloween Costumes. It is also great for any photos you may have of outdoor events, camping, etc.

Help your child cut a piece of construction paper slightly larger than the photo. Remember you will need enough room for the frame.

Glue the photo in the center of the piece of construction paper. I prefer glue sticks for this part.

Glue the sticks around the photo as a frame. Also glue any leaves or decorations you and your kids would like to add.

After the glue has dried on the front side you can glue the Tab from the Soda Can onto the back at the top to use as a hanger. That way your child can proudly display their creation on the wall in their room.

Tadpole Project

After all of the rain and storms we have had recently we found tadpoles in our swimming pool. We collected some w/ a net and put them into a container. We are going to watch them grow into frogs for our next project. Below is a link to a site about How to Raise Tadpoles.

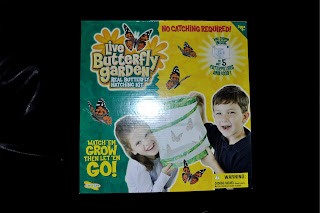
Live Butterfly Garden

Our Live Butterfly Garden kit arrived. I just ordered the larvae online w/ the coupon enclosed in the kit. We are looking forward to the larvae arrival to begin this project!

Our caterpillars arrived!
I hope you all can make heads or tails from these PICS. It is hard to get a good PIC because of the glare off of the plastic cup.

Our caterpillars are growing.
We should be entering phase 4 at any time!

Stage 4
The Chrysalis.

When fully grown, the caterpillars will turn into chrysalids, and in preparation for this they will, according to the species, descend to the floor of the cage (previously scattered with soil, leaves and grasses) or spin themselves up on supports (also provided in the cage for the purpose).

Very careful watch has to be kept in order not to miss this process, for it takes place in the space of a minute or two. The chrysalis stage is a resting period, and nothing more need now be done until the butterfly is ready to emerge.

Moved to their new home, The Butterfly Garden
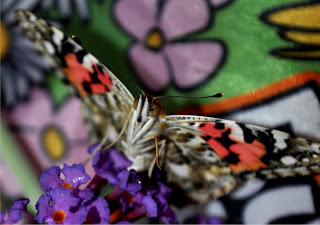
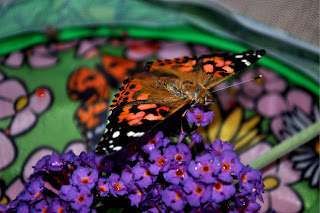
Our Painted Ladies Butterflies have hatched!
Look at her pretty face! You can click on the photo to enlarge.

We will be releasing these butterflies soon!

Sea-Monkeys Ocean-Zoo

There are quite a few tiny little things swimming around in Rylie's Ocean-Zoo! According to the website, when the Sea-Monkeys hatch they are almost too small to see; but, they grow rapidly. I will update as soon as possible when we see something big enough to photograph.

Hatching Sea-Monkeys. I found this kit at Big Lots for $8. You put in water and add the packet of purifier and wait 24 hours. Then add the eggs. On Day 5 you begin feeding them. The package says guaranteed to grow. We will see.

Here Rylie is adding the eggs. The water thermometer did not come w/ the kit. We purchased it from Walmart's pet section. The temp of the water will determine how fast the eggs hatch. 78 to 80 degrees hatches the fastest. Our thermometer is reading 80 degrees in the window. You need to use a clean plastic spoon to stir the water frequently to add oxygen back into the water.

According to the website I posted above, Sea-Monkeys can live up to 2 years!

UPDATE: We have quite a few Sea Monkeys swimming around. They are tiny little things though (shrimp like creatures); so, I have not been able to take a good photo of them to share.

Pine Cone Bird / Squirrel Feeders


This was such a fun project. My son and I gathered pine cones, tied a string around the top to use to hang the feeder, spread peanut butter over the cone{Note: If you or your child have peanut allergies don't give up ... simply substitute Sun Butter (made from sunflower seeds and completely nut free) for your peanut butter}, then roll in bird seed. This was a simple project that has brought us a lot of joy and learning. We watch our feeders to see what kind of visitors we will have that day, then discuss them. We have seen all kinds of birds and even squirrels eating from our feeders.

What you need:
Pine Cones (preferably found in nature)
String
Peanut Butter or Sun Butter
Bird Seed

*Tip: Use a spoon to apply the peanut butter / sun butter and coat each piece of the cone rather than stuffing the empty spaces w/ lots of peanut butter / sun butter. I've have tried both ways; and, if you goop it on the peanut butter / sun butter will be very messy and fall out in goops.

*Make sure you hang your feeder next to a branch or something the birds can stand on to eat from the feeder.

Here the birds can sit on the hummingbird feeder to eat off of the Pine Cone Bird Feeder.
The Pine Cone Bird Feeder the squirrel
is eating from we tied to the porch railing.
Look at that Beautiful Tail!
I think this little squirrel came back and stole the feeder! Note: Tie the string tight around the pine cone then tie around the railing. My string wasn't long enough; so, I just tied a new string around the railing and cut the other string off.

Oh well, we will just have to make another one. Good thing we have tons of pine cones!

More of our Mischievous Squirrels


We named this squirrel "Smiley"
Can you see "smiley" smiling?
Is anyone looking? Can I steal it?
We have at least 5 squirrels coming to visit and eat now. They are mischievous little thieves! So far they have stolen all of our Feeders! We bought a squirrel feeder and squirrel mix. Now we have happy squirrels that we enjoy watching!

They also love a spoonful of Sun Butter.
Here you can see one licking the spoon clean!

Do you love to watch squirrels eat and play? You can also sprout some sunflower seeds in the jar w/ a paper towel and water (like one of our other projects) or just plant seeds in dirt. Once our sunflowers bloom, we plan on using the bloom as a feeder for the birds and squirrels too. I will post photos in the future.

Sprouting Seeds In A Jar

Rylie saw Elmo sprouting seeds on Sesame Street and decided he wanted to try to do that. Here we have 2 jars. One has Sunflower seeds and the other has Zucchini Seeds.

What you need:
Seeds
Clear Glass Jar
Paper Towels
Water

Soak your seeds in water for 24 hours. Line your clear glass jar w/ a folded paper towel. Place your seeds between the paper towel and the glass. Make sure you leave the center open so that the seeds can get the oxygen they need to grow.

Put a small amount of water in the jar (make sure the water level is below the seeds). The paper towel will absorb the water and take it to the seeds. Place your jars in a warm, sunny spot. We chose a window seal. Make sure to keep a check on your water level. You do not want the seeds sitting in the water or they will rot. Nor do you want your seeds to dry out because they have no water.

Below our seeds are beginning to sprout!
Zucchini Seed

Sunflower Seeds
Zucchini Seed
Zucchini Seed

Sunflower Seeds
Sunflower Seeds

Today we planted our sprouted seeds in pots. Hopefully we will grow some zucchini to eat for dinner; and, sunflowers that we can use the seeds from to feed our birds and squirrels! Rylie enjoyed this so much we decided to do more seeds. We are soaking our cucumber and watermelon seeds now.

Update: Our Cucumber seeds are doing very well! More Zucchini seeds are also sprouting. Watermelon, not so much. We have one seed that is stating to sprout. Not sure how well it will do.